Saturday, March 22, 2014

National Quilt Day Winners! (~ Kari Huber)

My friend Kari came over this morning, and judged the winners of the DCQ national quilt day contest.

She carefully read all the entries, and loved each and every one.  It was a tough decision, but her decision is:

Grand Prize~ French General Tuffets

dezertsky wrote,
“Very hard to pick one MOST thing, but I think maybe it's the connection that I feel to the women from my genealogical past.  I don't know which ones quilted and which didn't, but I know my mother and grandmother did, and I suspect many others, too.  Especially when I hand quilt, I have that feeling of walking in their footsteps, even though our lives, on the surface are so different.  Underneath that surface, though ... I'm sure they worried about their children as they quilted, just as I do.  I'm going to bet they worried about how to make ends meet, just like I do.  They may have dreamed up new recipes, communed with their Savior, or daydreamed about better times to come ... just like I do.  It's only in quilting that I feel that commonality, and I treasure that feeling.”

Runner-up~Candy Dish Mini Quilt Kit

 Bonnie Dewald wrote,
“Quilting is important to me because it gives me self esteem to be able to see that I can create something.  It gives me confidence to try new things and it has also helped me with stress! It is the best stress reliever in the world!  I have a mom who has dementia, and I'm sure there are many others who also go through things like this as well but it has been super difficult for me and sewing relieves my stress so much I can live a normal life despite the pressures of home and work!  Thanks for the fun newsletters!” 

Consolation~ Tuffets & Morsel Patterns

Mary Fredricks wrote,
I like to put subtle themes and/or messages into my wall hangings, so that people have to ponder them a bit to catch the full impact. To watch someone 'get it' from something I have made makes me laugh out loud. I love that I am able to share my unique perspective of life with people that see my art.

Congratulations to dezertsky, Bonnie, and Mary: please send a message to dakotacabinquilts@ndsupernet.com and include your mailing address and phone number. 

I asked Kari to bring over some of her favorite quilts, and while she was judging the contest, I photographed them for your enjoyment.  Kari does all of her own free motion quilting on her sewing machine.

Violets: Technique crayons on fabric with Angelina fibres.  Kitty-wompus log cabin.
ndq3
Butterfly meadow:  Technique free motion quilting with zigzag.  Couching.  Button accents from Kari’s grandmother. This quilt was featured in a North Dakota State Historical Society Display: “Quilting Past and Present”.  It was chosen as “the Future of Quilting”, and it was on tour across the state for 2 years. 
nqd2
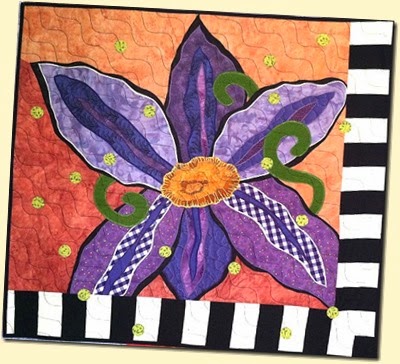
Dewdrops: From a Jane Sassamann workshop.  Traditional (not fusible) applique, satin stitching.  Center is free-motion zig-zag.
nqd1
Q is for Quilt: Kari has taught this class to beginning quilters a number of times.  Mixed beginner techniques.
nqd4
The center of the nine patches are crocheted bottle caps from her grandmother’s kitchen (these would have been used to make trivets)
nqd5
Rock Star: Technique Quiltsmart Lone Star.  Note the artistic free motion “rocks” in the borders, created with variegated thread.

Thanks, Kari… for brightening my day.

Thanks to all our readers for sharing your stories with us during our NQD celebration.

~ Laura

Friday, March 21, 2014

So many little quilts, so little time!

Hi, everyone!  This week’s Moda Candy Square project reminds me of a pretty little bag of colorful jelly beans…

570jllybeansbig

It’s called “Mite,” and is from one of my favorite pattern series, the “Little Bites” by Miss Rosie.

“Mite” has been on my mind lately, as I’ve been searching for the perfect little quilt to adorn my sewing nook.  The space is painted a soft blue, and I’ve been adding coral, leaf green, and cream accents as I come across them.  I don’t have much wall space, so miniature quilts with lots of color & detail are exactly what the space needs!

Imagine my happiness when I realized that we had most of the supplies to make “Mite”…  We ordered a few more bolts of fabric from the collection, and the colors are just perfect.

And, what’s not to love about the pattern…

Perky bow ties, set on point, a coral “peeper” or flange, and an interesting border from two pretty prints.

mmite

Plus, the prints are so fun: cute little 2 1/2” squares from the candy square pack:

But, I’ll be honest.  I am not starting this quilt tonight.  I cut & pressed my fabric, and I am setting the kit on my sewing table to inspire me to finish my Spring Sprouts quilt top, so I can send it to the quilter early next week.  It was the first day of spring yesterday, after all!

mmitekitcontents

I keep forgetting to tell you about my new favorite notion.  It’s the first thing I reach for when I am working with the 2 1/2 “ squares.  These excellent marking tools don’t pull, drag, or skip.  They make marking the little squares a pleasure rather than a joy.  This gift box includes a nice sampling of items, find it here. 

If you order between now & Wednesday, March 26, you can get the gift box for 20% off, $42.40.  If you bought the contents individually, the cost would exceed $60.00.

Note:  there will be a slight delay in shipping these, as I actually claimed the last one for my Hettinger sewing room (Sorry, Wes)…

sewlinegiftsetwithcase


Shop at DCQ for items mentioned in this post:


Happy Quilting~ Laura

Wednesday, March 19, 2014

Self Applause!!! I finished the Spring Sprouts Applique Blocks

Hooray!  I finished by the last 8 spring sprouts applique blocks.  For a total of twelve!

If you knew how easy this was, you wouldn’t be quite as impressed…

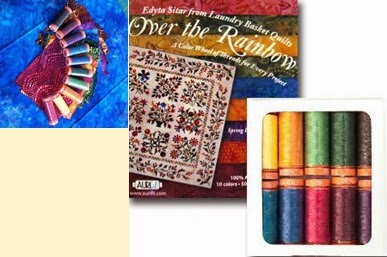
As mentioned in my previous post, I planned to use the lovely coordinating thread pack for the machine applique:

But, opted for invisible thread instead (I’m going to save that thread pack for piecing!)

ss32

My blocks came together just beautifully:

ss33

ss35


Fluffy declared them “nap-worthy”…  Don’t worry, I’ll lint roll them before I assemble the quilt. Cat face

ss34


So, call me crazy… but does anybody else really want to make Spring Bouquet next?

springbouquet


Same stunning fabric collection (Over the Rainbow Batiks by Edyta Sitar), same technique, but bigger blocks, larger quilt… just blossoming with loveliness.

I can’t quote you an exact kit price yet, as I am still checking on fabric availability/cost.  But,  if I order supplies for a Spring Bouquet for myself, are you interested? Post a comment and let me know what you think of the quilt, and whether you’d consider buying a kit.   That will help me decide whether to jump in with both feet!  And, it will give me some ammunition for convincing Wesley that it’s a really good idea Smile

Coming soon… I piece the Spring Sprouts Star blocks…  Here’s a preview…

Links to items shown in this blog:

Spring Sprouts Quilt Kit,

Over the Rainbow Thread Pack

Clear Invisible Thread (Sew-Art)

Smoke Invisible Thread (Sew-Art)

Happy Quilting~ Laura

Saturday, March 15, 2014

Chateau Rouge Candy Dish Quilt

As promised, I’m continuing on my journey using the 2 1/2” Moda candy squares to make some fun little projects.

I used the same pattern booklet for this one as I did for Marmalade Starburst.

The Chateau Rouge Candy Dish Quilt kit, fabrics by French General for Moda:

cd1

I started by laying out the candy squares, sorting by color & value.

cd3

Then, I played with fabric placement for the candy dishes, til I was happy with the arrangement.  I wanted the fabrics to “melt” together into a pleasing checkerboard.

Then, I used fusible web to make the little handles.  I wanted to do hand applique, but I couldn’t find my mini iron Eye rolling smile.  By the time Wesley found one for me (in the basement, of  all places, after I already had my pieces traced & fused!).

If you want to learn how to do these by hand, check out this past blog post, here.

The handles are fused into place, a little offset on the background rectangles.  I thought 1.5”  from one end looked about right. For machine applique, be sure to use a test piece to be sure you like your stitching before you start stitching.

These were really fun blocks to piece:

The two blocks are set on point, and if I followed the pattern exactly,  the quilt would have been done at this point.  But, I thought it looked unfinished… just begging for a border!

cd13

And, what better way to add a border, than to use a border stripe?  I fussy cut border segments, and carefully aligned my ruler 1/4” from the chosen edge.

cd14

First, I tried the filigree stripe around the full perimeter:

cd15

Then, I noticed the scraps of medallion stripes.  Hmmm..

cd16

I liked that.

I added the filigree to the sides, carefully stitching just one thread inside the stripe, so that it was in perfect alignment.

After I added the side borders, the medallion stripe was just a  little too wide…

cd19

So, I carefully folded it the medallion stripe in half, and altered it just a little bit to pull the ends in (I used a basting stitch and adjusted the seam allowance ‘til I was happy with the fit).

cd20

The final result:

cd23

cd21

cd24

I was left with a little pile of scraps.  And, I was seriously loving working with these beautiful fabrics. I combined my scraps with some other  French General prints from my stash, and look what I made for you!  See the post below…

cd25

Happy Quilting!

~ Laura

Celebrate National Quilting Day with DCQ

Good morning, and Happy National Quilting Day!
Yesterday, as I was happily stitching away on the Chateau Rouge Candy Dish quilt, I racked my brain for how to best celebrate this important day.  It finally came to me as used my scrap pile to stitch the Tuffets (shown below), with my scraps.  I thought about how many Tuffets I’ve made (probably 50 or more), and how many I have left (not very many)…
The reason?  I love to make Tuffets and give them as special gifts to my quilting friends.  I try to customize them to “match”  each recipient… by either using their scraps  from their favorite quilt project, or making them a special little tuffet in a color or quilt block pattern that reflects their personality.
This gesture signifies what I love most about quilting… it’s such a personal thing.  Every quilter I know has their own unique style, talent, and favorite technique.  Their quilts they make, and usually generously give to others,  are a window into their soul.
Which brings me to today… I invite you to share what you love most about quilting.  Enter your thoughts as a blog comment… and three lucky winners will receive either,
The Grand Prize… A set of three matching French General Tuffets, that I made, just for you, yesterday!
cd25
Or, the Runner Up Prize, a Chateau Rouge Candy Dish Quilt kit…
cd1
Or, the Consolation Prize,
Two patterns, the original “Tuffets” by Miss Rosie, plus her new version, “Morsel”…

Links to items in this blog:

I’ll ask my quilting friend Kari to help me judge the comments and pick her favorites.  She’s the most creative quilter I know!  We’ll  announce the three lucky winners next weekend.
Oh… I also have to show you my other set of Tuffets I made last night, for my friend Jaci.  She made me the most delicious homemade 5 cheese ravioli.  I made her some Tuffets… I just love the littlest one… it is so dang cute!
cd26
Happy National Quilting Day!  Be sure to enter the coupon code NQD into your orders this week.  Read our newsletter to learn why...


~ From Laura, Wesley & Matthew

Tuesday, March 11, 2014

Welcome to My World

As promised, I cleaned up my Bismarck sewing room a bit, so I could take some pics and show you my new sewing loft.  When we first moved into this house, this space sat empty for months.  We used to lie on the floor (because we didn’t have any furniture), and enjoy the sunlight streaming in through the high lofted windows.  Matthew called it our “relaxing room.”

To be honest, it took nearly 2 years to transform this little loft from the relaxing room  to our sewing room.  Why so long?  Well, I’ve been busy.  And, to be honest, I was stubbornly mourning for my “real sewing room” that I love in our Hettinger house.

But, gradually, our Bismarck house has become a home… and the relaxing room has become the sewing room.

Quilts adorn the banister,

mwb10

I recovered the ironing board with a fun twill,

mwb8

And used the left over fabric to make Sox a matching dog bed.  (Sadly, the cats love it more than he does. He acts like it is punishment to lie on it.  I had to bribe him with a treat to pose for this picture.)

mwb13

I added some matching accessories from Target & Hobby Lobby,

mwb3mwb2

And, splurged on a  lovely new sewing machine to match my Hettinger one (it just wasn’t working to haul my machine back and forth).

mwb14 

I got both machines from my friend Ann at the Quilt Connection in Rapid City.  Click here to check out their website.

My sewing nook makes me smile.

mwb9

It makes Fluffy purr.  Then again, there’s not much that doesn’t make Fluffy purr… Cat face

mwb1

Do you know what else makes me smile?  This…

mwb4.


To you, this might look like a simple checkerboard...

To me, it was a triumphant moment, as I finished the pieced inner border on a king size quilt top. 

A quilt,  that I made without a pattern Winking smile 

The project started when I found a Terrain charm pack and layer cake by Kate Spain in my stash… hmmm, you remember terrain, right?

  I was inspired by a block  I found in one of my favorite books, “Simplify”…  (find the book here).

simplifywithcamille10736


I made a bunch of blocks,  set them on point with white bella solid,  and the project grew…

mwb7

Because I was using cut goods not meant for this particular pattern, I ended up with a big scrap pile of 2” squares.  I just couldn’t bear to throw out them out.  So, I made a pieced inner border with my scraps.  I was so dang happy when that border fit, and the checkerboard alternated correctly at the final corner!

Wes was happy too… he had to help me (he’s a much better quilt planner than I am),  and he was sick of listening to me question his math.

mwb5

A final plain white border…

mwb12

And, the top is done!

mwb6

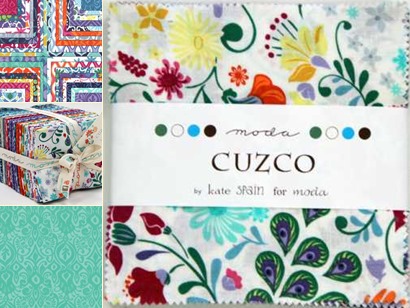
Ready to go to the quilter… I just love that backing fabric.   It’s from cuzco.  It took the whole bolt! 

mwb11

I used every scrap of the Terrain layer cake and charm pack.  Plus, yards, and yards of white bella solid.   In fact, I ran out of Terrain prints when I was about 95% done my blocks, and had to sub in a few Kate Spain cuzco prints.  

Cuzco is a really nice collection.  Unfortunately,  we’re nearly sold out…  Find a few charms, one  fat quarter bundle, and one accent print on our website.

I did set aside one cuzco charm pack though…  for a lucky blog reader.

Be sure you register for my blog (see the link at the left), so you have a chance to be entered in the drawing.  I’ll wait a few days, then notify the winner, and post your name in the comment box.

Hope you enjoyed this peek into my world.

Happy quilting!

~ Laura